Hello World!
In this lesson, we will begin by assembling our first program. The rest of this chapter will be dedicated to explaining how and why it works.
Note that we will need to type a lot of commands, so open a terminal now.
It’s a good idea to create a new directory (mkdir gb_hello_world, for example, then cd gb_hello_world to enter the new directory).
Grab the following files (right-click each link, “Save Link As…”), and place them all in this new directory:
Then, still from a terminal within that directory, run the following three commands.
CONVENTION
To make it clear where each command begins, they are preceded by a $ symbol. However, do not type it when entering them in your shell!
rgbasm -o hello-world.o hello-world.asm
rgblink -o hello-world.gb hello-world.o
rgbfix -v -p 0xFF hello-world.gb
‼️
Be careful with arguments! Some options, such as -o here, use the argument after them as a parameter:
rgbasm -o hello-world.asm hello-world.owon’t work (and may corrupthello-world.asm!)rgbasm hello-world.asm -o hello-world.owill work
If you need whitespace within an argument, you must quote it:
rgbasm -o hello world.o hello world.asmwon’t workrgbasm -o "hello world.o" "hello world.asm"will work
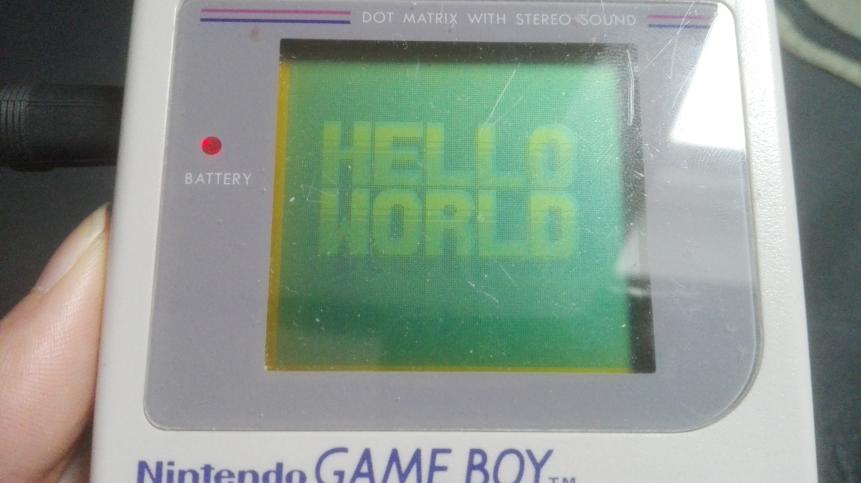
It should look like this:
(If you encounter an error you can’t figure out by yourself, don’t be afraid to ask us! We’ll sort it out.)
Congrats!
You just assembled your first Game Boy ROM!
Now, we just need to run it; open Emulicious, then go “File”, then “Open File”, and load hello-world.gb.
You could also take a flash cart (I use the EverDrive GB X5, but there are plenty of alternatives), load up your ROM onto it, and run it on an actual console!
Well, now that we have something working, it’s time to peel back the curtains…